Roots and ivy
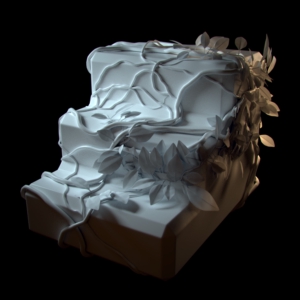
Roots and ivy is procedural generation Maya tool I’ve have been working on with other students. It was initially an exercise to practice python scripting in Maya. However, I brought it a bit further to make it shareable.
Speaking of power, it is not comparable with plugins or standalone programs. It still has the advantage to be a single short maya script, and I think it might be used for modest modeling cases.
As of 2021, I’m not maintaining this project. Today, I would probably use Houdini to generate this kind of geometry. However, here are the original link and tutorial.
Python script on GitHub.
Using the script
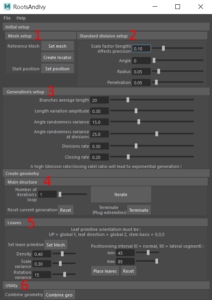
I recommend to setup your generation panel by panel, as is present them from 1 to 6.
1 - Mesh Setup
This is where you indicate the reference mesh, which is the mesh branches will grow on. It has to be one single object. Select your mesh and click Set Mesh. Then, you have to indicate where the branches should start to grow. Create a locator (there is a button for it), and place it near your reference mesh. You don’t have to place it exactly at the mesh surface since branches will be automatically snapped on it. You can then click Set position. It creates a little cylinder on the surface, where branches will start to grow. You can adjust that position by moving the locator and clicking Set position again.
2 - Standard division setup
The standard division is the smallest unit constituting branches. The cylinder you sees before starting the generation is what will be aligned to build more complex geometry. Use the “Standard division setup” panel to adjust its parameters. The scale factor determines its length and is directly correlated with precision: shorter units means a more frequent reevaluation of reference mesh in space. Others parameters are more obvious.
3 - Generation setup
These are the parameters controlling the generation. A branch is what will be generated in 1 iteration loop. Branches average length is the amount of standard unit in one branch. Division rate is the probability for a branch to divide into two at the next iteration loop. Closing rate is the probability for a branch to close (to constitute an extremity) at the next iteration loop. As written down the panel, a high division rate / closing rate ratio will lead to exponential generation.
Note that these parameters, instead of the ones in the second panel, can be modified during the generation. It is specifically useful for the two lasts.
4 - Create geometry – Main structure
That panel allows you to launch one or several iteration loop(s). If you are not satisfied, or if you want to modify the Standard division parameters, click reset. Using maya’s undo might lead to uncertain results.
The “Terminate” button will make one last iteration with finer branches, to transform “open” branches in extremities.
5 - Leaves
The Leaves panel allows you to duplicate a leaf mesh along the generated branches. You can use your own mesh, but it has to follow some orientation rules.
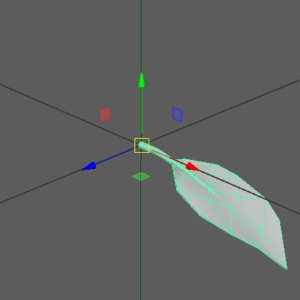
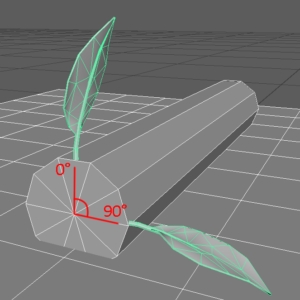
The leaf axis has to be the global X axis. Up side of the leaf is facing global Y direction. Place the stem basis on global (0,0,0). When your leaf mesh is scaled and orientated as described, select it and click Set mesh. Positioning interval represent the angular interval on the branch circumference leaves may be placed on. It goes from zero to 90. If your leaf is curved like the one I use, you don’t want it to penetrate the reference mesh, so the interval should not reach 90. 45 – 75 work well.
The others parameters control density, scale and orientation randomness. Click on Place leaves to … place leaves. If you are not satisfied, you can redo the placement as much as you want
6 – Utilities
The button here combine in one single mesh the last generated branches geometry. It doesn’t concern leaves that should be grouped together.
Reworking the shapes
The mesh density is constant. Note that branches are made of several tubes. Even combined, the vertices at their extremities are not merged. You can do it manually if you feel the need to. Very small thresholds values work well since concerned vertices are supposed to be at the exact same position.
Applying a subdivision smooth at render improves the visual, but you might also loose some interesting sharpness at curves. A good way to control this is to add divisions to your mesh. Use the add division tool in linear mode (try increasing only U or V) to add transversal divisions, but no longitudinal ones.
Deleting and reorientation leaves should be easy since they are separated objects with pivots at their junction points. Note that leaves are not instances (for optimisation reasons).
Limits
The pictures have being made with a good knowledge of the tool capacities. They have also needed some cleaning and reworking of the geometry. The script has lot of limits. Here are some.
The more iterations there are, the higher is the probability to have interpenetrating geometry. When crossing another branch, the generating branch should climb over it. Currently, it still offen penetrates it. That’s a known problem. To solve it, the surface of the mesh that is hidden by an in-place branch should be ignored by the algorithm. I didn’t found a way to set this up yet.
The leaf placement system is trivial. It simply places an object relatives to the surface orientation. Leaves do not interact with each others and will offen interpenetrate.
There is no undo support. You should use the Reset button that deletes the whole current generation.
The script also seems to struggle when the reference mesh has to much polygons.
